No-pain Gardening: How to plant a tree using ergonomics

Landscaping, gardening, planting or yard work—no matter what you call it, it’s physical work that requires using not only brain power but also muscles and the entire body. This labor-intensive work can cause muscle strain and soreness, but it still can be fun and rewarding.
Learn the healthiest way to plant for the plants themselves—and for yourself.
As a horticulturist and garden center owner, I do this type of physical work regularly, so you might think it would become easy. That’s somewhat true, but each day is different, and each planting site or planting hole is different. This presents its own set of challenges—and working safely is the most important factor in meeting those challenges.
No matter how long you’ve been gardening, there are some tips of the trade that can equip you with the best tools for the job and teach you what to do to make your chores a little easier while also preventing injury.
Gardening takes time
I often say that gardening is for a lifetime, not just for one weekend. That is at odds with an instant-gratification world where people may think that the perfect desired landscape can, somehow, happen in just a day.
This is often when problems can arise. Injuries and other bad outcomes can stem from rushing when you realize you have underestimated the time or physical exertion required for a project. Other sources of frustration are not having the proper tools and not being sure how to successfully complete a task. Distractions also can hamper your focus and keep you from working safely.

Equip yourself for success
The proper way to plant a single tree or shrub also hits the high points of general gardening safety, or ergonomics, that you should employ. It starts with how to pace yourself.
To avoid the hazards in rushing the job, keep in mind that it can take five to 10 minutes to dig a hole for a root system in a 3-gallon container and 20 to 30 minutes to dig a hole for a tree in a 15-gallon container when soil conditions are good—longer when they are not so good.
“Work at your own safe pace,” advises Andy Smart, landscape manager at The Plant Kingdom in Louisville and a Shelby Energy Cooperative consumer-member. Be prepared in case the task takes longer than expected.
Working smarter and paying attention to your body is worth the extra time. Len Coughlin, staff physical therapist for Baptist Health in Louisville, advises, “Plan ahead and take breaks as needed to give your muscles time to recover.” Don’t forget to drink plenty of water. Even in cool weather, adequate hydration will help combat potential sore muscles.
Prepare for the tree or shrub planting task as you would any other physical training or sport: make sure you have the proper equipment and stretch before you begin. Great tools make gardening easier, so it is important to invest in tools that are durable and are appropriate for the task. Basic tools are a nursery spade, a tool file, a hard rake and pruners. You also may also want a shovel, leaf rake, pruning saw and good pair of gloves.
Coughlin adds sturdy shoes to the list. “People should avoid sandals, flip-flops or open-back shoes while working in their yard or garden to protect their feet and ankles from injury and reduce the risk of falls,” he says. “Preventing falls when working on wet or uneven surfaces is important.” Closed-toe shoes are especially important when using sharp tools like a nursery spade.

Dig it safely
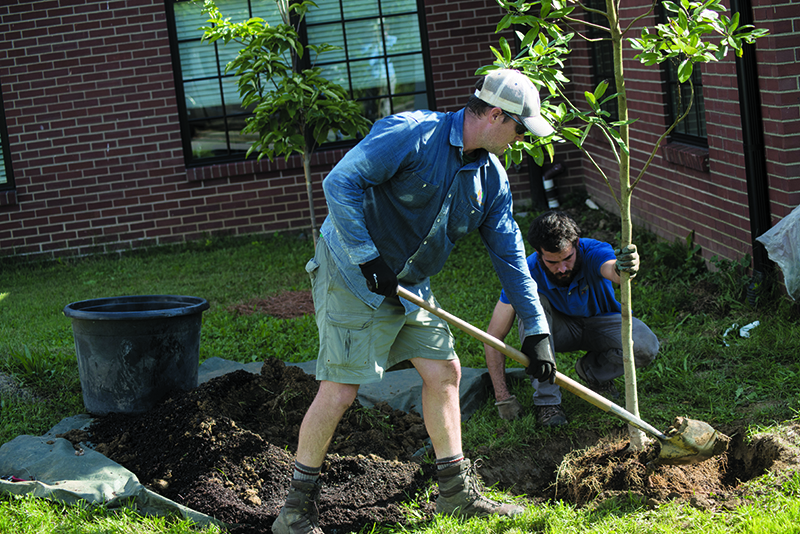
With the appropriate sharp tools at hand, dig the hole. It’s one of the most important steps in the planting process, and integral to the establishment and long-range health of the tree or shrub. Don’t breeze through it; take your time and do it right.
The hole should be dug two to three times wider than the root ball or root system of the tree or shrub. Spending energy to dig wider is good, but don’t waste your time and energy digging any deeper than is necessary. The depth of the hole should be no deeper than the height of the root ball or root system. Planting a tree or shrub where the root ball sits higher or lower than the soil line is never appropriate.
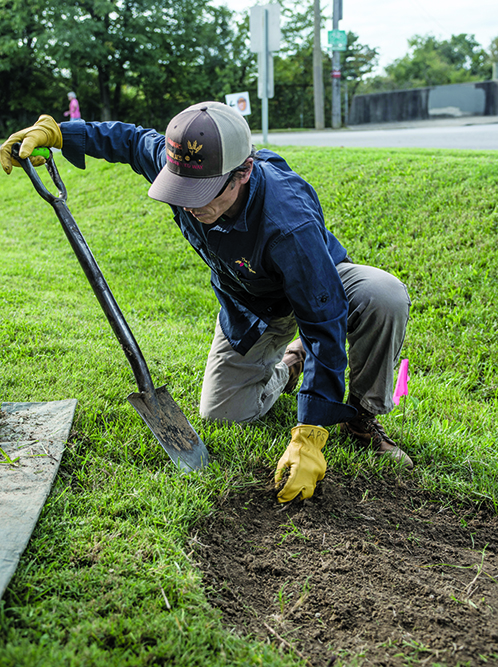
The nursery spade is meant to cut through the soil and is designed to be sharpened to make this process faster and easier on your body. Its short handle helps keep your arms close to the body, reducing stress. If more power is needed to dig, lower your center of gravity and kneel down to get closer to the hole. This will make it easier to dig and keep your back in a neutral position.
A shovel is designed for excavating loose soil from the hole. If you encounter large roots along the way, use pruners or a pruning saw to remove them. Remove any large rocks, but small or gravelly rocks are not a problem.
Move it safely
After the planting hole, the second important factor is care of the tree or shrub during the planting process. This includes getting plants, which are often heavy and awkward to carry, to the area where they will be planted. You not only want to prevent injuring yourself, but to prevent injury to the root ball, trunk or branches of the new tree or shrub.
When lifting or moving heavy trees and shrubs, Coughlin advises to “pivot with our feet instead of twisting our back to reduce rotational strain on the spine.” And while lifting, “keep objects close to the body,” he says, “and stand up straight to reduce the force on the back.”
Accidental plant damage, particularly to the trunk, can be devastating and prevent the tree or shrub from successfully establishing itself. Be careful when removing the nursery container prior to planting. Do not pull or yank the tree or shrub out of the container, which could damage it or hurt you. If it won’t slide easily out of the container, then cut away the plastic container with sharp scissors or pruners.

Lift and place
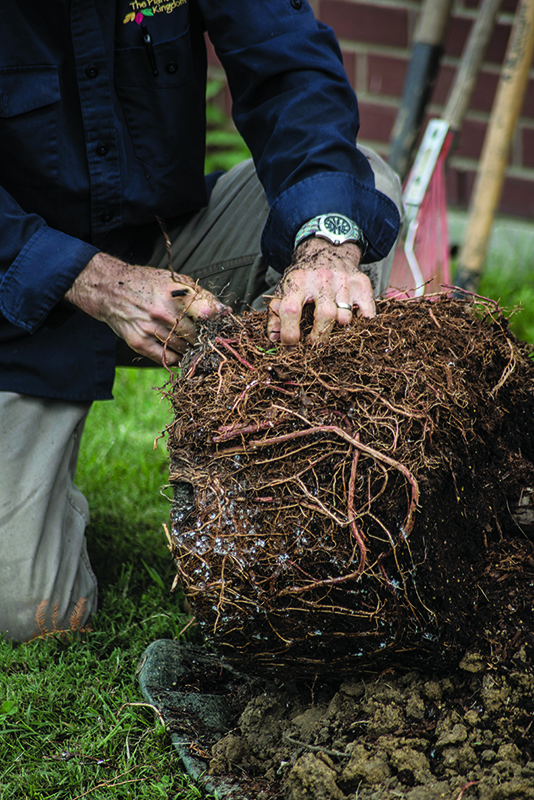
Once the hole is dug and the plant has been removed from its container, the planting process begins in earnest. Unwind any circling roots using your hands or, when necessary, cut the roots using pruning shears. Spread out the roots in all directions. You may have to get a little rough on the root ball to accomplish this, but don’t skip this step that is critical to the plant’s health.
Carefully and safely—this includes asking for help if you need it—lift and place the plant into the planting hole, checking to make sure the root ball is at the correct height before backfilling. The piled-up soil that came out of the hole is exactly what you will put back into the hole to complete the planting.
Make sure the plant is upright and straight before backfilling to avoid digging it back out to re-straighten. Never wrench a tree or shrub around in the hole to straighten it, which can damage the plant and potentially injure you.
Do not add any different soil, soil amendments, fertilizer or other material to the backfill. This not only saves you a step but ensures that the root system grows and establishes quickly.
Fill the hole evenly, surrounding the root ball with soil as you go. Gently firm up the soil around the root ball with a nursery spade or the toe of your shoe or boot (another reason why closed-toe shoes are important) to remove gaps or air pockets in the soil. Do not pack the soil too tightly, as this will inhibit the new roots’ ability to grow through the soil.

Mulch and water
Check to be sure the newly planted tree or shrub is still straight, then apply mulch to the planting area. Organic mulches, such as hardwood, pine bark and pine straw, are excellent options, purchased in bags or bulk. Bags are easier to manage and carry, but be careful when lifting heavy bags. Coughlin’s advice about how to lift heavy trees and shrubs applies here as well.
A 2-inch layer of mulch is ideal—4 inches or more not only wastes money but will have a negative effect on the new planting. The mulch should cover the planting area evenly to prevent weed growth and help the soil retain moisture. Don’t pile up mulch around the trunk or base of a tree or shrub.
Watering after planting is important for hydration and, more importantly, to settle the soil around the root system. Some gardeners prefer to water at intervals throughout the planting process; my preference is to water at the end so the site stays cleaner, reducing the slip hazard from mud.
Watering during the first year is critical. Most plants that don’t survive beyond the first year are either watered too much or too little. Research the needed amount of water for your specific plant.
Clean up the work site and pick up all the tools. Cleaning and storing them away ensures a safe landscape space and cuts down on frustration and lost time the next time you are looking for a tool.
Finally, there is nothing wrong if you’re a little sore after all this. Planting can be like a really good workout at the gym, only better.

